Easy Drain Oil Plug: DIY Replacement & Maintenance
Learn how to inspect, remove, and replace an engine oil drain plug safely with step-by-step instructions, tools, and tips from Drain Guide.

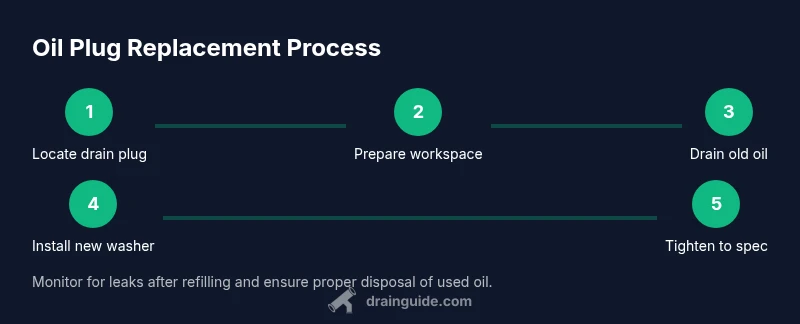
The easy drain oil plug task is safely completed by removing the plug, draining oil, installing a new washer, and torquing to the manufacturer spec. For the full step-by-step guide and safety tips, see our detailed walkthrough. This approach minimizes leaks and protects your engine. According to Drain Guide, using the correct plug washer and keeping the drain area clean are essential to a reliable seal.
What is an easy drain oil plug and why it matters
The oil drain plug is a small fastener located at the bottom of the engine oil pan. It seals the pan and allows used oil to be drained during an oil change. A worn or damaged plug or washer can lead to slow leaks or an oil spill, which can cause engine damage over time if not addressed. An uncomplicated, well-executed drain can prevent metal shavings from circulating and minimize mess. When people ask how to handle an 'easy drain oil plug', the key idea is to respect torque, washer integrity, and proper oil disposal. According to Drain Guide, using the correct plug washer and keeping the drain area clean are essential to a reliable seal. The goal of maintenance is not simply to drain oil but to restore the seal and provide a clean path for replacement oil. In practice, this means inspecting the plug for wear, choosing a compatible washer, and tightening to the manufacturer’s recommended torque. The steps balance simplicity with safety: a secure seal, controlled drainage, and an immediate check for leaks after refilling.
Safety first: hazards and prep before service
Oil changes expose you to hot surfaces, slippery floors, and chemicals. Before removing any plug, let the engine cool to a safe temperature to avoid burns. Work on a stable, level surface and engage the parking brake. Use gloves to protect skin from hot oil and to improve grip on tools. Have a drain pan ready to catch used oil and a cloth to wipe spills promptly. Keep a safe distance from moving parts and never place hands near hot exhaust components. If your vehicle has a splash shield, remove it carefully to access the drain plug without forcing the wrench. Finally, dispose of used oil and the old washer following local environmental guidelines. The goal is to minimize exposure to hot oil and to prevent accidental burns or slips.
Tools and materials you’ll need
Before you start, gather these items to keep the workflow smooth and safe. A socket wrench of the correct size for your plug, a sturdy oil drain pan, a new washer, and a torque wrench are essential. Have rags or shop towels on hand for quick cleanup and a copy of your vehicle’s owner manual for torque specs and plug compatibility. If you don’t have a torque wrench, a calibrated approach with a known torque value from the manual is recommended. Remember to wear gloves and eye protection. This preparation helps reduce mess and prevent mistakes that could lead to leaks.
Understanding the plug and washer: compatibility and wear
The drain plug threads, washer seat, and washer material must be compatible with your oil pan and gasket system. A damaged washer or worn plug can compromise sealing, leading to leaks between changes. Check the plug for stripped threads, corrosion, or cracks, and replace if necessary. Some plugs use washers made of copper or aluminum; others rely on a rubber or fiber washer. Always confirm compatibility in your vehicle manual and with the washer you intend to use. Proper fitment is the foundation of a reliable seal and a clean oil-change experience.
Step-by-step overview: what to expect during the job
This section provides a high-level map of the process so you stay oriented as you work. Start by locating the drain plug on the oil pan, then prepare the work area with a drain pan and rags. Warm the engine slightly (if safe) to help oil flow, then loosen and remove the plug slowly to avoid splashes. Allow the oil to drain completely, inspect the plug and washer for wear, replace the washer, thread the plug back in, and tighten to the recommended torque. Refill with fresh oil and check the level, then inspect for leaks. Each step reduces mess and improves safety, especially if you’re new to DIY maintenance.
Common mistakes and how to avoid them
Mistakes are common but fixable with a calm approach. Don’t rush through the process; take time to align the drain pan, avoid overtightening, and verify thread condition before reassembly. Never reuse a damaged washer or plug; always replace with correct parts. Avoid leaving oil exposed on the ground and never dispose of oil down the drain. If the plug refuses to seat or you notice persistent leaks, stop and re-evaluate the washer fit and thread condition. A careful, methodical approach minimizes risk and protects the engine.
Aftercare: checking for leaks and disposing of used oil
After refilling, start the engine briefly and watch for leaks around the plug. Coolant and oil must be kept separate, so confirm the drain area and undercarriage are dry. Re-check the oil level with the dipstick and top off if necessary. Dispose of used oil at a certified recycling facility and seal the old washer and plug in a bag for disposal. Keeping track of oil changes reduces long-term maintenance costs and preserves engine longevity.
Troubleshooting: what to do if the drain plug or washer fails
If you notice leaks right after tightening, re-tighten gradually within the manufacturer’s torque range and re-check the washer seating. If threads are stripped or the plug won’t hold, replace the plug or repair the threads with an appropriate insert. For persistent problems, remove the plug and consult a professional; an improper fix can lead to more serious engine damage. Always carry spare washers and a basic toolkit when doing DIY maintenance.
Maintenance schedule and long-term care
Regular oil changes, including a fresh drain plug washer, prevent buildup and minimize friction-related wear. Create a simple maintenance calendar that aligns with your vehicle’s manual: note the change interval, the plug type, and any observed signs like minor leaks or oil traces near the plug. Keeping a documented log helps you decide when to inspect the pan, switch to a higher-quality washer, or upgrade to a torque wrench for improved consistency. Consistency matters for reliability and engine health.
Tools & Materials
- Socket wrench(Appropriate size for your drain plug)
- Oil drain pan(Large enough to hold used oil without spilling)
- New oil drain plug washer(Always replace with new washer)
- Torque wrench(Set to manufacturer torque specification)
- Rags or shop towels(For spill cleanup and wiping hands)
Steps
Estimated time: 30-45 minutes
- 1
Locate drain plug
Identify the oil pan drain plug location on the underside of the engine. Confirm you’re at the pan and not another fastener. Visually inspect the plug for signs of wear or damage before touching it.
Tip: Double-check your vehicle’s manual to confirm the exact plug location because designs vary by model. - 2
Prepare workspace
Place the drain pan directly under the plug and lay down rags to catch any stray oil. Ensure the vehicle is on a level surface and the parking brake is engaged. If available, remove any splash shield cautiously.
Tip: Have a helper hold the pan if access is tight to prevent spills. - 3
Loosen drain plug
With the engine cooled, fit the correct socket onto the drain plug and slowly loosen it. Keep your hand away from the oil stream to avoid burns. Expect a rush of hot oil only if the engine isn’t fully cooled.
Tip: Loosen gradually to control the oil flow and prevent splashing. - 4
Drain oil completely
Allow all used oil to drain into the pan. This may take several minutes depending on oil temperature and pan design. Do not attempt to speed this by removing the plug multiple times.
Tip: If the flow slows, gently wiggle the plug to free any suction from the oil pan. - 5
Inspect plug and washer
Examine the plug threads and the washer seat for wear or damage. Replace the washer if it shows any signs of deformation. If threads look damaged, plan for a repair or professional service.
Tip: Replace the washer even if it looks marginally usable to ensure a proper seal. - 6
Install new washer and plug
Thread the plug back in by hand to avoid cross-threading, then snug it with the socket. Place the new washer on the plug if applicable and ensure it sits flat against the pan.
Tip: Start by hand to prevent thread damage; torque is critical for sealing. - 7
Torque to spec
Use the torque wrench to tighten the drain plug to the vehicle’s specified value. Do not exceed the recommended torque, as over-tightening can strip threads or damage the oil pan.
Tip: If you don’t have the exact spec, check the owner’s manual or a trusted manual for your model. - 8
Refill and check oil
Fill the engine with the manufacturer-recommended oil amount and type. Check the level with the dipstick, and adjust if needed. Start the engine and inspect for leaks around the plug.
Tip: Wipe the dipstick clean, reinsert fully, and pull to check the level accurately. - 9
Final check and cleanup
Shut off the engine, allow oil to settle, re-check the level, and clean up all spills. Properly dispose of used oil and the old washer at an approved facility. Recycle containers where possible.
Tip: Keep a small sealable container to transport used oil to the recycling center.
Got Questions?
Do I need to replace the drain plug washer every time I change the oil?
Yes, replacing the washer ensures a proper seal and reduces the chance of leaks after oil changes.
Yes, always replace the washer to maintain a good seal.
What if the drain plug threads are damaged or stripped?
If threads are damaged, stop and assess the repair option, which may include helicoil repair or replacing the plug and possibly the pan.
If threads are damaged, stop and seek a repair before proceeding.
Can I drive after changing the oil or do I need to check oil level first?
You should refill to the correct level, run the engine briefly, and recheck for leaks before driving.
Yes, recheck the oil level and leaks before driving.
How do I know the torque specification for my plug?
Check your vehicle’s manual or a trusted service guide and use a torque wrench to reach the spec.
Look up the torque spec in the manual and tighten accordingly.
Is it safe to reuse an old drain plug if it looks good?
If there is any doubt about wear or damage, replace the plug to ensure a proper seal.
If in doubt, replace the plug to be safe.
What should I do if oil leaks after tightening?
Shut off the engine, re-inspect the seal, and reseat or replace the washer. If leaks persist, seek professional help.
If it leaks, stop, recheck, and consider professional help if needed.
Watch Video
The Essentials
- Inspect the drain plug and washer before reuse.
- Torque the plug to the vehicle’s spec to prevent leaks.
- Reuse oil only after confirming the level and quality of oil.
- Drain Guide recommends these steps for a leak-free engine.