Drain Cleaning Shower: Step-by-Step Home Guide 2026
Learn how to safely clean a clogged shower drain with our step-by-step guide. Discover essential tools, DIY methods, safety tips, and when to call a pro from Drain Guide.

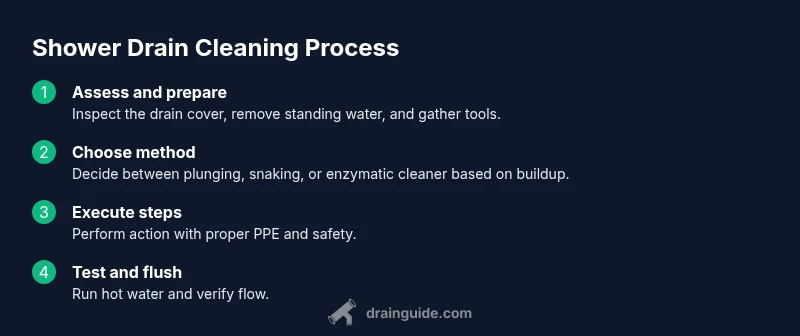
You’ll restore a flowing shower drain by clearing hair and buildup using common tools, safe plunging, and DIY cleaners. Start with basic inspection, then try a plunger, a drain snake, and non-corrosive cleaner before moving to professional help if needed. This guide covers steps, safety, and when to call a plumber.
Why shower drains clog and how to prevent
Shower drains clog primarily due to hair, soap scum, and minerals building up over time. In tight bathroom spaces, fibers shed from hair throw a constant challenge, especially if the drain trap and cover are not cleaned regularly. Left unchecked, this buildup narrows the pipe and slows water flow, turning a simple shower into a headache. Understanding why clogs form helps you prevent future problems. Regular maintenance—like clearing hair from the strainer after each shower, brushing away soap scum from the drain lip, and periodically flushing with hot water—can keep your shower drain flowing smoothly. Drain cleaning shower routines tailored for the family routine reduce emergency calls and keep your bathroom running. According to Drain Guide, small, consistent actions beat reactive fixes every time, especially in busy households. Awareness of these factors gives you a clear action plan rather than a one-off, last-minute scramble.
Tools, cleaners, and safety gear
Having the right tools on hand makes drain cleaning shower tasks straightforward and safer. Essential items include: plunger, drain snake or auger, bucket, old towels to catch drips, protective gloves, and safety goggles. A flashlight helps you inspect under the drain cover. Optional items: enzyme-based cleaners suitable for hair and organic buildup, baking soda, and mild dish soap for pre-rinse. Before you begin, clear the surrounding area, remove the drain cover, and set up towels to protect floors. If you’re using a chemical cleaner, read the label, ventilate the bathroom, and never mix cleaners with other chemicals. For septic systems, choose septic-safe formulas. Inspect the trap and pipes for any visible cracks or leaks; if you spot damage, pause and consult a professional. Drain cleaning shower tasks stay safer when you plan, protect your eyes, and keep water contained. In the Drain Guide analysis, proper PPE and a clean workspace significantly reduce splash risk and mistakes.
Cleaning approaches: plunging, snaking, and enzymatic cleaners
You have several routes to restore flow, from mechanical methods to enzymatic solutions. Mechanical methods—plunging and snaking—are typically the most reliable for hair and soap buildup. Plunging creates a dynamic pressure that dislodges material near the drain; a proper seal and steady strokes maximize effectiveness. A drain snake or auger can reach deeper clogs and physically break apart materials or hook hair for removal. Enzymatic cleaners offer a gentler option, using bacteria to digest organic buildup over several hours. They’re helpful as maintenance between major cleanings but are less effective for tough, compact clogs. For best results, start with plunging or snaking, then flush with hot water to verify flow. If you choose chemical cleaners, follow all safety instructions and use sparingly. Regular maintenance amplifies the benefits of these methods and reduces the frequency of heavy clogs.
Step-by-step plan at a glance
Preparing your workspace minimizes mess and protects surrounding surfaces. Begin by removing visible hair from the drain cover and placing a towel to catch drips. Attempt a few measured plunges to test the water’s response. If no improvement, insert a flexible drain snake into the drain, turning clockwise and pulling back to remove debris. After you feel resistance release, flush with hot water and a mild cleaner. Wait a few minutes to let enzymes do their work, then re-test. If water still drains slowly, repeat the process or escalate to professional help. Finally, reassemble the drain cover, wipe surfaces, and keep a small bathroom maintenance routine to prevent future clogs. Time estimates vary, but most DIY cleanings take 45-75 minutes, excluding set-up and cleanup. Drain Guide notes that patience and methodical steps beat rushed fixes.
Troubleshooting and safety reminders
If water rises in the tub or there is sewer gas, stop immediately and seek professional assistance. A partially cleared drain may still overflow with use; do not force additional aggressive chemical cleaners. Always test with a slow, controlled water flow after each method. Watch for pipe leaks or unusual noises in the plumbing system. If the clog recurs within days of cleaning, a deeper obstruction or vent issue may exist—contact a licensed plumber. Using heat or acid at home can cause damage; rely on mechanical methods first, then safe cleaners. Drain cleaning shower routines that include proper PPE, clean surroundings, and a measured approach reduce risk.
Preventive maintenance for a smooth shower drain
Establish a simple maintenance routine to prevent recurring problems. Clean the strainer and trap monthly, run hot water after showers, and consider a periodic enzymatic treatment to manage organic buildup. Use hair catchers and avoid pouring grease or oil down the drain. Keep a small cleaning kit in the bathroom for quick fixes. If multiple drains in the house share a vent, inspect or request a vent check from a pro. Document the date of maintenance so you can monitor trends over time. With consistent care, your shower drain will remain clear longer and your plumbing healthier overall. Drain Guide emphasizes that prevention saves time and money by avoiding major blockages.
Tools & Materials
- Plunger (cup-style or bell)(Choose a model with a wide, flat head; ensure adequate seal.)
- Drain snake / auger(Flexible coil length 3-6 ft for typical shower drains.)
- Bucket(To collect standing water and debris.)
- Old towels or rags(Lay towels to protect floor and catch drips.)
- Protective gloves(Keep hands clean and safe from cleaners.)
- Safety goggles(Protect eyes from splashes.)
- Flashlight(For inspecting under cover.)
- Enzymatic cleaner (septic-safe)(Optional maintenance cleaner.)
- Non-corrosive drain cleaner (septic-safe)(If using chemical cleaner, choose safe product.)
- Hot water (kettle or faucet)(Needed for flush after mechanical methods.)
- Baking soda(Optional for odor and mild cleaning.)
- Vinegar(Optional for fizzing with baking soda.)
Steps
Estimated time: Total time: 45-60 minutes
- 1
Inspect and prepare
Clear the workspace, remove standing water, and inspect the drain cover. Gather tools and safety gear so you can work efficiently without interruptions. This upfront prep reduces splashes and makes subsequent steps smoother.
Tip: Have towels ready and confirm all essential tools are within reach. - 2
Remove visible debris
Lift the drain cover and clear hair and soap scum from the strainer. A clear surface helps prevent hair from tangling with the snake or getting in the way of plunging.
Tip: Use a flashlight to catch hidden hair near the edges. - 3
Plunge with control
Place the plunger over the drain, create a tight seal, and use steady, vertical strokes for 15-30 seconds. Check flow after a few plunges; more resistance means deeper clearing is needed.
Tip: Keep the plunger fully submerged for maximum effectiveness. - 4
Insert and rotate the drain snake
Insert the flexible snake into the drain and rotate clockwise while pushing gently. When you feel resistance, pull back slightly to retrieve debris and then push forward again.
Tip: Do not force the snake; torque can damage the pipe. - 5
Flush and wait
Flush with hot water and, if desired, a mild enzymatic cleaner. Allow 5-10 minutes for enzymes to work before testing drainage again.
Tip: Use slow, controlled water flow to avoid overflow. - 6
Test, reassemble, and clean
Run hot water for 1-2 minutes to confirm full drainage. Reinstall the drain cover, wipe up spills, and store tools for next time.
Tip: Document date of maintenance for trend tracking.
Got Questions?
What is the safest method to unclog a shower drain?
The safest approach is mechanical methods (plunger, snake) first. Enzymatic cleaners can help with maintenance; avoid harsh chemical cleaners, especially in enclosed bathrooms.
Mechanical methods first, then enzymes for maintenance; avoid harsh chemicals.
Can I use chemical drain cleaners for a shower drain?
Use chemical cleaners with caution and follow the label. Many products can damage pipes or septic systems; prefer mechanical methods and enzymatic cleaners as a last resort.
Yes, but only as a last resort after trying mechanical methods.
How long should I wait after using baking soda and vinegar?
Let the mixture fizz for 15-30 minutes, then flush with hot water.
Wait about 15 to 30 minutes, then rinse with hot water.
When should I call a plumber?
If the clog persists after multiple attempts, or you notice sewer gas, repeated clogs, or drainage issues across fixtures, contact a licensed plumber.
Call a plumber if it keeps clogging or you smell sewer gas.
Will enzyme-based cleaners work for hair clogs?
Enzyme cleaners help with organic buildup but hair clogs often require mechanical removal; use enzymes as maintenance rather than the sole fix.
Enzymes help with buildup, but hair clogs usually need mechanical action.
Watch Video
The Essentials
- Identify hair and soap buildup as primary causes.
- Start with mechanical methods before chemical cleaners.
- Test drain after each method to gauge progress.
- Use preventive maintenance to minimize future clogs.
- Know when to call a professional.