How to Drain an Irrigation System: A Homeowner's Guide
Learn how to safely drain your irrigation system to prevent winter damage and simplify spring startup. This Drain Guide tutorial covers tools, safety, and best practices for homeowners, with a clear step-by-step process and practical tips.

Goal: safely drain your irrigation system to prevent freeze damage and prepare for maintenance. You’ll need basic tools, a garden hose, and a bucket, plus a shut-off valve. This guide walks you through depressurizing lines, draining zones, flushing debris, and verifying complete discharge before storage. Expect to work slowly and test each zone for residual pressure before closing.
Why drain irrigation system matters
According to Drain Guide, draining an irrigation system before winter or long storage helps prevent cracked pipes, ruptured fittings, and damaged valves. Ice formation can expand tiny gaps and stress joints, leading to leaks when you re-activate the system. A proper drain also reduces sediment buildup and makes spring startup smoother. Homeowners who drain systems regularly report fewer backflow concerns and longer component life. By understanding your layout and drainage points, you can protect plants and avoid costly repairs. This section lays the groundwork for a safe, efficient drainage workflow and shows how a well-drained system supports consistent irrigation performance year after year.
Key concepts to keep in mind are the location of the main shut-off, zone valves, backsiphonage risks, and the backflow preventer. Drain Guide analysis shows that most drainage problems stem from overlooked drain ports, clogged screens, or left-open valves. Mapping your zones and marking drain points saves time during maintenance and reduces the likelihood of leaving water in lines that could freeze.
Safety first: hazards and preparation
Drain work involves water flow, plumbing connections, and potentially electricity near irrigation controllers. Always wear gloves and eye protection. Do not drain or discharge water near electrical outlets or devices; shut off power to any pumps or controllers first. Work in daylight or with a bright flashlight, and avoid slippery surfaces. If you have a backflow preventer, take extra care handling its test cocks to avoid accidental release of pressurized water. This section details essential safety steps so you can protect yourself and your property while draining.
- Disconnect power to any irrigation pumps and controllers before starting.
- Keep children and pets away from the work area.
- Have a secondary bucket and towels ready for spills and drips.
Planning your drainage approach
A clear plan makes draining faster and safer. Begin by locating the main shut-off valve for the irrigation supply and the backflow preventer. Determine whether your system has drain valves or a hose bib at the end of the mainline. If your system lacks dedicated drains, you’ll need to attach a hose to a drain port and direct water to a safe location. Drain Guide recommends mapping each zone, noting where lines run underground, and identifying potential wind exposure or gardening areas that could be impacted by water runoff. This section helps you build a step-by-step plan tailored to your layout and climate, reducing trial-and-error time during the actual drain.
Tools, materials, and prep steps
Before you start, gather the essential tools and materials so you don’t have to hunt for parts mid-drain. The core kit includes a wrench or pliers, a garden hose compatible with drain ports, a bucket for collecting standing water, rags for spills, and a marker for labeling components. If you have a backflow preventer, you may need a tester or capped ports to drain it. Having extra hose length, zip ties, and a flashlight helps you reach tight spaces and keep everything organized. This block aligns your shopping list with your system’s specifics and sets you up for a smooth workflow.
- Tools: adjustable wrench, screwdriver, pliers, and possibly a backflow test kit
- Materials: garden hose, bucket, rags, clamps or hose adapters
- Optional: marker for labeling, extra hose length, flashlight
Draining step overview: depressurize, drain zones, and flush
The drain process hinges on depressurizing the mainline, then removing standing water from zones and critical components. Start by closing the main shut-off valve, then relieve pressure by opening any available drain valves or test cocks on the backflow preventer. Attach a garden hose to a dedicated drain port or hose bib and drain water into a safe location. Finally, manually cycle each zone to drain lines and remove any debris trapped in valves or filters. This overview captures the core actions and order to keep water flow controlled and predictable during the drain.
Common issues and how to handle them
Common problems include residual pressure after initial draining, clogged drain valves, and water in the backflow preventer. If pressure remains, reopen the main valve slightly and re-open test cocks to vent air and push water out. If a drain valve is clogged, disconnect and clean it, then reattach securely. For backflow concerns, inspect gaskets and ensure the device remains above ground level to prevent freezing. This section provides practical remedies to keep your drain process on track.
Winterizing and post-drain checks
Once the system is drained, inspect for wear, leaks, and damaged seals. Clean the valve boxes and remove debris that could hinder spring startup. Mark the zones and label hoses for easy reassembly in spring. Reconnect power to any pumps only after confirming water is fully drained and the main supply is ready to reopen. At this stage you’re preparing for storage and a smooth reactivation when temperatures rise, reducing the risk of leaks or pressure-related failures.
Maintenance tips for reliable irrigation drains
Regular maintenance helps prevent emergency drain attempts and keeps your irrigation system ready for seasonal use. Schedule periodic checks of drain ports, valve boxes, and backflow preventers. Flush debris from strainers and screens, and replace any worn gaskets. Keep a small maintenance log noting when you drained, what issues were found, and what was repaired. Drain Guide emphasizes consistent upkeep as the best defense against costly spring repairs and unexpected failures.
Troubleshooting quick-start checklist
If you encounter trouble, keep this concise checklist handy: 1) confirm main shut-off is fully closed, 2) verify all zone valves are in OFF/idle position, 3) confirm drain valves are open and water is actively flowing away, 4) inspect for leaks around fittings or the backflow preventer, 5) recheck water flow after re-sealing connections, 6) store hoses and components properly. This quick-start guide helps you resolve common drainage hiccups without unnecessary delays.
Tools & Materials
- Main irrigation shut-off valve(Locate near water source; ensure you can access it easily)
- Garden hose(Attach to drain port or hose bib; ensure compatibility)
- Bucket or trough(For collecting water; choose a size that fits your space)
- Pliers/adjustable wrench(For loosening/tightening fittings)
- Rags or towels(Mop up drips and wipe fittings)
- Flashlight(For dark valve boxes and backflow areas)
- Marker or tape(Label lines and components for reassembly)
- Backflow preventer test kit (optional)(If you plan to drain or test this component)
Steps
Estimated time: 60-90 minutes
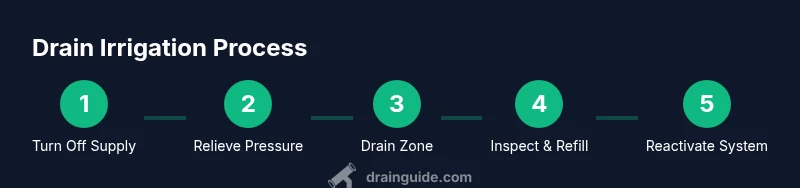
- 1
Locate and close the main shut-off
Find the irrigation main shut-off valve and close it firmly. This stops incoming water and begins the depressurization process. Confirm there is no visible pressure when you try to reopen a small vent or test cock.
Tip: Take a quick photo of the valve location for spring reassembly. - 2
Relieve pressure from the system
Open any installed drain valves or test cocks on your backflow preventer to vent residual pressure. If your system has a dedicated drain port, open it and let water drain slowly. If no drain ports exist, proceed to step 3 with caution.
Tip: Stand back to avoid a sudden spray; wear eye protection. - 3
Attach drain hose and position water discharge
Connect a garden hose to the drain port or hose bib and direct wastewater to a safe area away from plants, animals, and electrical outlets. Keep the hose low and supported to prevent kinking and backflow. Allow water to run until the flow tapers off.
Tip: Check for kinks and secure hose to prevent movement during draining. - 4
Drain each zone one by one
Set the controller to OFF and manually operate each zone valve to empty the run pipes. Open the zone's bleed or drain if available and observe for ongoing leaks or trapped water. Move to the next zone only after the current one is clear.
Tip: Label zones so you remember their order during reactivation. - 5
Inspect and flush critical components
Inspect the backflow preventer, filters, and valve boxes for sediment or debris. Flush screens and remove any clogging material. If you see scale or mineral buildup, note it for spring maintenance.
Tip: Use a flashlight to inspect tight spaces; loosen fittings gradually. - 6
Cap risers and secure the system
Close any remaining drain ports, cap risers, and ensure all valves are in a safe, dry position. Keep hoses elevated to prevent pooling around the boxes. Store portable components in a dry area.
Tip: Seal caps to avoid accidental water entry or freezing. - 7
Reconnect water and test gradually
Slowly reopen the main shut-off and re-pressurize each zone. Check for leaks at joints and fittings, then run a short cycle to confirm proper flow. If leaks appear, shut off and reseat fittings before continuing.
Tip: Test one zone at a time to isolate any leaks quickly. - 8
Document and plan for spring startup
Note any worn components or recurring issues. Create a simple maintenance checklist and photograph key valve positions and connections for spring reactivation. Store a lightweight spare parts kit in the irrigation shed.
Tip: Keep a simple log; a quick reference saves time during spring startup.
Got Questions?
Why should I drain my irrigation system before winter?
Draining removes water that could freeze and crack pipes or fittings. It also reduces sediment buildup and makes spring startup smoother.
Draining helps prevent freeze damage and makes spring startup easier.
What tools do I need to drain irrigation?
You’ll typically need a main shut-off valve, a garden hose, a bucket, pliers or a wrench, and a flashlight. Optional items include a backflow tester and labeled markers.
Essentials are a shut-off valve, hose, bucket, and basic tools.
Can I drain without a dedicated drain valve?
Yes. If there’s no drain valve, attach a hose to a drain port or hose bib and drain water to a safe location. If no port exists, you may need to carefully vent through the backflow preventer test cocks.
Attach a hose to a drain port if available; otherwise vent using the backflow components with care.
How long does the draining process typically take?
Time varies with system size and layout, but plan for about an hour to an hour and a half for a typical residential system.
Expect about an hour or more depending on system size.
Is it safe to drain into a garden bed or soil?
Yes, as long as you avoid fertilizer runoff and direct water away from plant roots that could be harmed by excess moisture. Do not drain near electrical systems or outlets.
Drain water away from electrical risk areas and plants that could be harmed by excess moisture.
What maintenance should follow after draining?
Check and clean filters and screens, inspect the backflow preventer, and note any worn components. Create a short maintenance log for spring reactivation.
Inspect components and record any needed repairs for spring startup.
Watch Video
The Essentials
- Drain before winter to prevent freeze damage.
- Securely close the main shut-off and relieve pressure first.
- Drain zones one by one and inspect backflow components.
- Document the process for an easier spring startup.
- Maintain a routine drain schedule for reliability.