How to Snake a Tub Drain: A DIY Guide
Learn how to snake a tub drain safely with a hand auger. This practical guide from Drain Guide covers tools, steps, maintenance, and safety tips to restore proper drainage.

By the end of this guide you will be able to snake a tub drain using a hand auger safely and effectively. Gather a drain snake, brushes or pliers, towels, bucket, and gloves. Follow the step-by-step process to locate the drain’s cleanout, insert the cable, rotate to break up the clog, and test the drain for proper flow.
Understanding the tub drain clog and when to use a snake
Hair and soap scum are the usual villains behind tub drains that run slow or stop altogether. Water draining slowly is a sign that hair, skin flakes, and mineral deposits have formed a compacted mass inside the trap or along the pipe. In many cases, a relatively shallow clog near the drain can be cleared with a hand auger—also called a drain snake. According to Drain Guide, snaking is a targeted method that preserves the pipe when used correctly and reduces the need for caustic cleaners. The tub’s trap, elbow joints, and nearby cleanout vary by model, so the first step is to inspect the area and identify how you will access the interior of the line. If your tub has a visible cleanout cap or a removable cover, you can skip guesswork and proceed to insert the snake with a clear path. If not, you may need to loosen a trap adapter or remove an access plate. Not every clog requires a snake; for soft, moveable debris, plunger or hot-water flushing may suffice, but for hair clogs or buildup that won’t budge with water alone, a snake offers the best chance of restoring full drainage without displacing seals or liners. Drain Guide’s practical approach emphasizes starting with the simplest method and escalating to mechanical tools only when necessary. In many homes, the first sign of trouble is a slow drain that worsens after shampooing or bathing. Treat this as a cue to check the trap and plan a careful snaking session rather than rushing to harsher methods. The outcome hinges on a calm, measured approach that protects pipes and fixtures.
Safety and prep before you start
Before you touch the drain, set up a safe work area. Remove any loose items from the bathroom floor and lay down towels to catch splashes and debris. Put on protective gloves (nitrile or rubber) and, if you have them, eye protection. A flashlight helps you visualize the interior of the drain and confirm you’re aligning the snake with the cleanout or access point. If your tub uses a pop-up stopper or a removable trap, consider placing the bucket beneath to catch overflow water. Drain snaking can push hair and gunk back toward the trap; be prepared to flush the area with water as you work. If you’re using a metal snake, handle it gently to avoid scratching porcelain or chrome finishes. Drain Guide’s analysis highlights that a calm, methodical approach minimizes accidents and reduces the chance of damaging the gasket seals around the drain. If you feel unsure about the location of any cleanout plug or if the drain is unusually tight, pause and re-check your access route. When in doubt, consult a professional or refer to the manufacturer’s maintenance guide for your tub model.
Tools and materials you’ll need for tub drain snaking
Being prepared saves time and reduces mess. The core kit includes a handheld drain snake with a flexible 6-foot cable, a sturdy bucket to collect water and debris, and a few towels to keep the area dry. A flashlight is helpful for inspecting the interior and locating the cleanout cap. For stubborn fittings or tight caps, a pair of channel-lock pliers can help you loosen the cap without damaging the fixture. A tray or lid from the tub’s underside can also be used to catch droplets when you retract the snake. If your drain features a removable trap, you may want to have a mild detergent or a small amount of mineral oil on hand to help the cable glide through the metal bends. Do not rely on power tools for this job; electric augers are designed for professional use and carry a higher risk of pipe damage. Drain Guide recommends starting with the basics and assessing the clog’s resistance before deciding whether to upgrade equipment.
Step-by-step overview of the snake method (high level before you dive in)
Think of the snake method as three phases: access, insert, and extract. First, locate an accessible point where the cable can reach the clog without kinking around a trap. Second, slowly feed the cable into the drain while maintaining gentle pressure and turning the handle to rotate the tip. Third, retrieve the cable with controlled motions, removing hair and debris as it collects on the surface. This high-level overview helps you understand the rhythm of the process and sets expectations for the more detailed steps that follow. Throughout the process, keep a bucket handy for waste, and pause if you notice water backing up in the sink or tub; you may be pushing water toward a deeper blockage rather than removing it. Drain Guide’s practical guidance emphasizes patience and instrumental handling of the tool, rather than brute force, to protect your piping system and fittings.
Common mistakes and how to avoid them
Avoid the most frequent missteps that turn a simple snaking job into an ongoing nuisance. Do not force the cable through sharp bends or past a heavy blockage; this can kink the cable and damage the fixture. Do not neglect safety gear; a splash of dirty water can spread bacteria or irritants. Do not skip inspecting the cleanout access; if you attempt to insert the snake through a wall or concealed area, you risk injuring yourself or the pipe. Do not rush the rotation; slow turns allow the hair and soap scum to wrap around the snake more cleanly, enabling easier retrieval. If you see water pooling or you hear gurgling after you remove the snake, re-check the trap and consider repeating the process once more. By avoiding these mistakes, you’ll improve your odds of successfully clearing the clog and avoiding service calls.
Maintenance and post-cleanup: testing and preventing future clogs
After you clear the drain, re-test the tub by running hot water for several minutes to confirm steady drainage. If the flow remains sluggish, repeat the insertion and rotation steps, or consider flushing the line with a gentle mixture of baking soda and warm water to lift residual buildup. Regular maintenance reduces future clogs; keep hair out of the drain with a mesh stopper and schedule periodic cleaning every few months. Drain Guide recommends a simple preventive routine: weekly hot-water flushes, occasional vinegar and baking soda treatments, and a careful evaluation of the trap’s P-trap to ensure the seals remain intact. If you have a shared drain line, be mindful of other fixtures feeding into the same stack; a clog at the main line can mimic a tub-specific issue, so coordinate your efforts with the other bathrooms in the home.
When to call a professional and the Drain Guide verdict
Some clogs simply resist a homeowner’s best efforts. If you cannot locate the cleanout, or if the clog remains after two or three complete attempts, it’s time to bring in a licensed plumber. A pro can diagnose whether the blockage is hair, soap scum, mineral buildup, or a deeper sewer issue. The Drain Guide team emphasizes safety and reliability; they recommend seeking professional help when access is unclear or repairs may compromise the plumbing system. The verdict is clear: DIY snaking is a valuable skill for minor, localized clogs, but it is not a substitute for professional service when structural problems or complex drainage patterns are involved.
Tools & Materials
- Handheld drain snake (auger)(6-foot flexible cable recommended for most tubs)
- Bucket(To catch water and debris)
- Gloves (nitrile or rubber)(Protect hands; avoid latex if sensitive)
- Old towels or rags(Absorb spills around the drain)
- Flashlight(Helps inspect interior and locate cleanout)
- Channel-lock pliers(Loosen stubborn cleanout caps without damage)
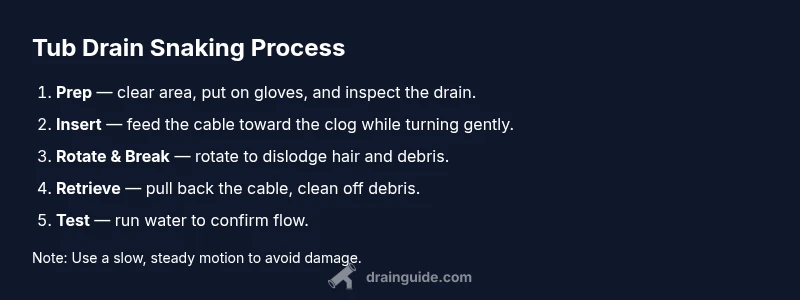
Steps
Estimated time: 30-60 minutes
- 1
Access the drain and locate the cleanout
Clear the area around the drain. If there is a cleanout plug, remove the cap to expose the access point. Use a flashlight to inspect the opening and the trap. Confirm you have a straight path for the snake without hitting a curve that could kink the cable.
Tip: Check for a removable cleanout cap before forcing the snake. - 2
Insert the snake and feed it toward the clog
Insert the end of the cable into the drain and push gently while maintaining steady pressure. Feed the cable toward the clog, stopping if you feel resistance, and avoid bending the cable sharply. Keep the cable aligned with the drain’s axis to prevent kinking.
Tip: Keep tension on the cable and avoid forcing it through tight bends. - 3
Rotate and break up the clog
Rotate the handle to work the snake against the clog. When you feel resistance decrease, slowly rotate and push a bit further to dislodge hair and debris. Periodically pull back a few inches to clear the material from the tip.
Tip: A quarter to half-turn strokes work best; don’t rush this step. - 4
Retrieve the snake and clear debris
Pull the cable back slowly, continuing to rotate to loosen any material. Inspect the cable for hair and debris and wipe clean as you go. Stop the pull if you notice snagging or resistance beyond a comfortable limit.
Tip: Stand by with towels to catch debris when the snake exits. - 5
Test the drain and flush the line
Run hot water down the drain for several minutes to ensure flow is restored. If water is slow, repeat steps 2–4 once more. If the clog returns quickly, consider alternate methods or professional evaluation.
Tip: If flow remains poor, stop and consider professional help.
Got Questions?
What is tub drain snaking best used for?
Snaking is effective for hair clogs near the drain and light mineral buildup. For deep or multiple-blockage scenarios, consider other methods or professional help.
Snaking clears hair clogs near the drain and light blockages; deeper blockages may require different methods or a pro.
Can I snake a plastic tub drain safely?
Yes, but handle the cable gently to avoid bending plastic components or risk of cracking. If you encounter a stubborn plug, stop and reassess.
You can snake a plastic tub drain, but be gentle to avoid bending parts; stop if you hit resistance.
What if water backs up after snaking?
Stop using the drain and inspect the trap and vent. If the backup continues across fixtures, a larger clog may exist in the drain line.
If water backs up, stop using the drain and check the trap and vent; persistent backups may indicate a bigger clog.
When should I call a professional?
If you cannot locate the cleanout, there’s no access, or multiple attempts fail to clear the clog, seek professional plumbing help.
Call a professional if you can't access the cleanout or after several failed attempts.
Is it safe to use chemical drain cleaners after snaking?
Avoid chemical cleaners immediately after snaking. They can react with debris and sealants; flush with water and consider safer maintenance.
Don’t use chemical cleaners right after snaking; flush with water and consider safer maintenance.
Watch Video
The Essentials
- Wear gloves and safety gear.
- Identify cleanout access before starting.
- Feed slowly, rotate, and pull debris.
- Test the drain after cleaning.