How Much Drain Field Do You Need for a Septic Tank
Learn how to estimate septic drain field size using daily flow, soil tests, and local codes. Drain Guide provides practical steps, safety tips, and planning strategies.

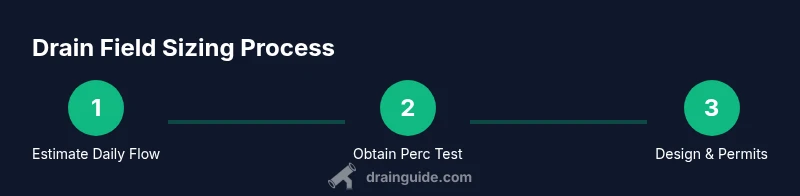
According to Drain Guide, sizing a septic drain field starts with your home's daily wastewater flow and the soil's absorption capacity. There isn’t a one-size-fits-all number; local codes and soil tests determine final size. Drain Guide recommends starting with a reliable daily flow estimate, a professional percolation test, and a compliant design plan before excavation.
What sizing a septic drain field means
Sizing a septic drain field means determining the total area needed to safely distribute effluent from the septic tank into surrounding soil. The right size protects groundwater quality, prevents surface sogginess, and minimizes odors and backups. According to Drain Guide, the process starts with a reliable estimate of your daily wastewater flow and ends with a soil-tested, code-compliant layout. Field size is not a guess; it hinges on measurable factors rather than intuition.
Essential factors that determine drain-field size
Several factors drive the final field area:
- Daily wastewater flow: how many fixtures and how much water your household uses.
- Soil absorption capacity: driven by soil type, compaction, and groundwater depth.
- Local regulations and setback requirements: codes may define minimum field areas or trench counts.
- Site constraints: slope, existing structures, and seasonal water issues.
- Maintenance expectations: routinely monitoring and avoiding compaction helps keep field performance.
Understanding these factors helps homeowners discuss options with a licensed designer and plan a realistic installation budget.
The role of soil tests and percolation rates
Soil tests tell you how quickly soil accepts and disperses water. A perc test or soils report indicates absorption rate, which influences trench length and gravel depth. Slow-absorbing soils typically require larger areas or alternative designs, while fast-absorbing soils can use more compact layouts. Drain Guide analysis shows that soil absorption rates and daily flow account for most variability in field size, with site constraints and climate as supporting factors. Always have a professional conduct or verify tests and interpret the data to ensure a compliant design.
How to estimate field size using daily wastewater flow
To estimate the required drain-field area, start with your estimated daily wastewater flow (in gallons per day) based on fixtures, usage patterns, and occupancy. Next, obtain a soil absorption rate from a perc test or soils report. The general relationship for sizing is Area = DailyFlow / AbsorptionRate. Once you have the area, convert it into a practical layout (for example, the number and length of trenches) while respecting setback distances and local codes. Finally, have the plan reviewed by a licensed professional to confirm compliance and feasibility. This method keeps the process transparent and auditable for inspections.
Common drain-field designs and layouts
Conventional gravity drain fields use long trenches filled with gravel and perforated pipe laid in bedding sand. Alternative layouts include mound systems on poor soils, chamber systems, and pressure-dosed designs. In all cases, maintain proper clearance from roots, pavement, wells, and streams. Drain Guide emphasizes that field design should adapt to your site while meeting safety standards. The choice depends on soil, slope, water table, and cost considerations, not just aesthetics.
Maintenance, safety, and common pitfalls
Protect the field from heavy machinery and tree roots, avoid parking or gardening directly above it, and monitor for damp spots. Regular inspection and pumping of the septic tank are essential; neglect can lead to backups or field failure. Always follow safety codes when digging; use protective gear and call 811 before excavation. Proactive maintenance reduces the risk of expensive repairs and keeps the system performing as designed.
Working with professionals and permits
Consult a licensed septic designer and obtain permits from your local health department. They can provide design calculations, help with perc test interpretation, and schedule inspections during installation. Drain Guide urges homeowners to stay involved, review diagrams, and verify that work complies with local regulations. A well-documented process minimizes delays and provides clear documentation for future property transactions.
Tools & Materials
- Daily wastewater flow estimation (gallons per day)(Derived from fixtures and usage patterns; consult a pro for accuracy)
- Soil perc test or soils report(Includes infiltration rate and soil profile)
- Soil map or site plan(Shows soil types and groundwater depth)
- Measuring tape and stakes(For layout and trench marking)
- Shovel/trenching spade(Initial site exploration)
- Permits and design documents(Obtain from local health or building department)
- Drain-field materials (perforated pipe, gravel, bedding sand)(Qty varies by layout per final design)
- Safety gear and utility locator service(Hard hat, gloves; call 811 before digging)
Steps
Estimated time: 2-6 weeks for planning, testing, and permitting; installation timing varies by site conditions
- 1
Gather fixture data and estimate daily flow
Create a list of all fixtures connected to the septic system and estimate daily usage based on typical usage patterns. Document occupancy and peak usage periods to refine the daily flow. This step sets the foundation for all sizing decisions.
Tip: Document each fixture count and usage pattern for accuracy - 2
Order a soils perc test and site evaluation
Hire a qualified septic designer or soils engineer to perform a perc test, soil profile assessment, and groundwater evaluation. Request written results and interpretation to guide design decisions. This waiting period often determines whether the site needs a conventional or alternative system.
Tip: Schedule during a dry season for reliable test results - 3
Review local codes and setback requirements
Check with the local health department or building official for minimum field size, trench spacing, and setback distances from wells, water bodies, and structures. Document the applicable code references and keep copies for permits.
Tip: Ask for the official code sheet and any amendments - 4
Draft a preliminary trench layout
Sketch a layout with multiple trenches, considering access for pumping and future maintenance. Use the perc test results to guide trench lengths and gravel depth, and incorporate ease of construction into the plan.
Tip: Keep the layout simple to test viability before finalizing - 5
Finalize design and obtain permits
Have a licensed professional finalize the design, ensure all calculations meet codes, and submit permit applications. Obtain written approval before any trenching or excavation begins.
Tip: Keep copies of plans and test results handy for inspections - 6
Prepare site and coordinate installation
Prepare the site, arrange equipment access, and schedule installation within the approved permit window. Coordinate with the contractor for inspections and any required soil restoration or grading.
Tip: Ensure weather window and safe excavation; mark utilities before digging
Got Questions?
How is drain-field size calculated?
Size is based on daily wastewater flow and soil absorption rate; a perc test is essential. Local codes provide tables that guide minimum area. A licensed designer should confirm the final design.
Drain-field size depends on daily flow and how fast the soil can absorb water; a perc test helps determine the final area.
Can I reuse an old drain field?
Old fields may be reused only if tests show adequate absorption and no contamination. If absorption is poor or contamination is detected, replacement or remediation is required.
You can reuse an old field only after tests show it’s still effective and safe.
What if the soil has slow absorption?
Soils with slow absorption may require a larger field, mound systems, or alternative designs. A professional will propose options based on the site and test results.
Slow-absorbing soil might need more space or a different system design.
Do I need permits for this work?
Yes. Most jurisdictions require permits and inspections for septic work. Check with your local health department for requirements and timelines.
Permits and inspections are usually required for septic work.
How long does installation take?
Installation time varies with site conditions, weather, and contractor schedules. Expect a range from a few days to several weeks, depending on complexity.
It varies; your contractor will give a timeline based on conditions.
What maintenance is needed after installation?
Regular septic pumping, avoiding soil compaction over the field, and periodic inspections help preserve function. Address any soggy spots or odors promptly.
Keep the field healthy with regular pumping and avoiding heavy use over it.
Watch Video
The Essentials
- Estimate daily flow early in the project.
- Rely on soil tests to define absorption capacity.
- Permits and professional oversight are essential.
- Design with future expansion in mind.
- Maintain the field to protect longevity.