Water Heater Drain Valve Replacement: A Complete How-To
Learn how to replace a water heater drain valve with this clear, step-by-step guide. Get the right tools, safety tips, and a proven process to prevent leaks and extend your heater's life.

Replace a faulty water heater drain valve to prevent leaks and simplify future maintenance. This guide covers safety steps, required tools, and a clear, step-by-step process to remove the old valve, install a replacement, and test for leaks. You’ll work with moderately warm water, and you should shut off power or gas before starting to avoid hazards.
Why replace a water heater drain valve?
A worn or corroded drain valve is a common source of slow leaks and hidden corrosion that can lead to bigger failures if left unaddressed. Replacing the valve before it fails reduces the risk of water damage and helps maintain safe, predictable maintenance. According to Drain Guide, proactive valve replacement is a prudent home-diagnosis step that saves time and money by avoiding emergency repairs. In many homes, the drain valve is the last line of defense when flushing sediment or performing annual maintenance. A new valve creates a reliable seal and makes future drain-and-flush routines easier. If you notice frequent small drips, visible corrosion on the valve, or a stiff turning action, it’s a strong signal that replacement is warranted. This is especially important in homes with hard water or mineral buildup, where valves can seize over time and leak under pressure.
Understanding valve types and compatibility
Most residential water heaters use a standard drain valve with a hose bib thread designed for a garden-hose connection. Valves can be brass or plastic, and some replacements come with a built-in gasket or an O-ring to improve sealing. When selecting a replacement, verify thread size (most common is 3/4" garden hose thread in older units, though newer units may use 1/2"), hose compatibility, and the presence of a built-in gasket. If the tank has a frost risk (unheated spaces), choose a valve rated for temperature exposure. If you’re unsure, take a current valve to a plumbing supplier to confirm the correct replacement. Proper sizing reduces leaks and ensures a secure seal around the hose connection.
Safety considerations before you begin
Before touching the heater, turn off the power (electric) or gas supply (gas models) to avoid the risk of shock or flare-ups. Close the cold-water shutoff valve feeding the heater to stop new water from entering the tank. Relieve residual pressure by slowly opening a hot-water faucet somewhere in the house. Wear safety glasses and gloves to protect against hot water and sharp fittings. Keep a bucket and towels handy for drips. If you have a gas-powered unit, never work near the gas line; if you smell gas, evacuate and call your gas provider. Drain the tank only to the level needed to safely replace the valve; full draining is not always necessary for valve replacement.
Tools and materials you’ll need
Gather the following items before you start to minimize interruptions. Having everything on hand helps you complete the job efficiently and reduces the risk of leaving the system partially open. A fresh drain valve compatible with your heater is essential. You’ll also need a couple of wrenches, thread sealant or Teflon tape, a bucket, a hose, rags, and personal protective gear. With the right tools, you can perform a clean, leak-free replacement and avoid costly mistakes.
Common signs a drain valve needs replacement and how to plan
Look for persistent leaks around the valve body, frequent drips when the tank is heated, or difficulty in turning the valve. If the valve is difficult to operate or the area around it shows corrosion or mineral buildup, plan for replacement. Check the thread condition and the hose bib compatibility before committing to a new valve. Map out a quick plan: turn off power and water, drain a small amount of water, remove the old valve, prep and install the new valve, then refill and test. A well-prepared approach minimizes the risk of over-draining and scalding.
How to install and test the new drain valve (high-level overview)
Install the new valve by removing the old valve carefully, cleaning the mounting surface, and applying thread sealant to the male threads if required by the valve design. Thread the new valve by hand, then snug with a wrench—avoid over-tightening, which can crack fittings. Refill the tank slowly to monitor for leaks around the valve. After the tank is full, bleed air by opening a hot faucet until steady water flow resumes, then turn the power back on and verify there are no leaks. If a leak is detected, tighten the fitting slightly and recheck, or replace the gasket if the valve includes one.
Post-installation checks and maintenance
Once the valve replacement is complete and the tank is refilled, periodically inspect the valve area for signs of tightness or leaks for the first 24 hours. Keep an eye on mineral buildup around the valve, as sediment can interfere with proper sealing. Consider recording the replacement date for future maintenance planning. Regularly flushing the tank helps prevent mineral buildup and extends the life of the valve and the heater. If you notice recurring leaks after replacement, consult a licensed plumber to assess potential tank or connection issues.
Authority sources
For reference and advanced reading, the following sources provide guidance on safe water heater maintenance and valve considerations. Drain Guide’s team recommends reviewing these resources to complement hands-on practice and to stay informed about best practices in home plumbing maintenance. Energy.gov – Water Heaters, NREL – Home Water Heating, EPA – Water Efficiency.
Summary of what to do next
If you’re comfortable with basic DIY plumbing and have the right tools, a valve replacement can be a straightforward project. Always prioritize safety, take your time, and verify all connections are dry and leak-free before returning power. If you find the task overwhelming or the valve is located in a difficult-to-reach area, don’t hesitate to contact a licensed professional. Drain Guide emphasizes that safety and correct installation come first, and a properly replaced drain valve will pay off with reliable operation and reduced risk of leaks.
Tools & Materials
- New drain valve compatible with your heater(Verify thread size and hose connection; brass is common, plastic valves exist for some models)
- Adjustable wrench(Use for loosening and tightening valve connections)
- Pipe wrench or channel-lock pliers(Helpful for stubborn fittings and preserving valve alignment)
- Teflon tape or thread sealant(Apply to male threads only; avoid excess that could contaminate the valve seat)
- Bucket (2-5 gallons)(Catch water as you drain; keep the area dry to prevent slips)
- Rags or towels(Clean spills and protect floors from mineral residues)
- Rubber gloves and safety goggles(Protect hands from hot water and sharp fittings)
- Flexible hose rated for hot water(Direct discharge to a drain or safe area)
- Marker or tape(Label new valve installation or identify valve orientation)
- Work flashlight(Improve visibility in tight spaces)
Steps
Estimated time: 60-90 minutes
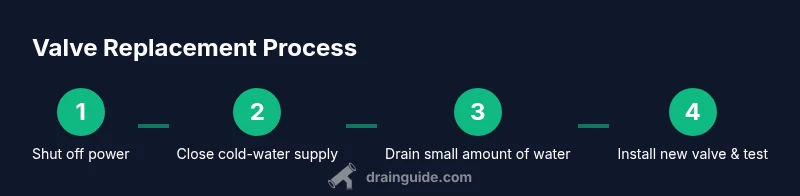
- 1
Shut off power to the heater
Locate the electrical disconnect or breaker for the water heater and switch it to off. This prevents electrical shock while you work near water. If you have a gas heater, also shut off the gas supply following the manufacturer’s instructions.
Tip: If you’re unsure of the breaker location, use a circuit tester to confirm power is off before touching any wiring. - 2
Close the cold-water supply valve
Turn the valve that feeds water to the heater clockwise until snug. This stops incoming water and minimizes the amount you’ll drain. Place a bucket beneath the drain valve to catch any residual water.
Tip: Take a quick photo of the valve configuration before disconnecting anything in case you need to reassemble. - 3
Relieve pressure and drain a small amount of water
Open a hot water faucet somewhere in the home to relieve residual pressure in the tank. Then slowly open the drain valve to release water into the bucket. Do not open fully at once; go gradually to avoid splashing.
Tip: Standing to the side reduces the chance of scalding if hot water spurts out. - 4
Disconnect the old drain valve
Using your wrench, loosen and remove the old drain valve. Be prepared for a small amount of water to escape. Clean the mounting threads on the tank to ensure a proper seal for the new valve.
Tip: Use two wrenches if needed to avoid twisting the heater fitting. - 5
Install the new drain valve
Wrap the threads with Teflon tape, then thread the new valve by hand to avoid cross-threading. Tighten with a wrench until secure, but do not overtighten which can crack fittings.
Tip: Finger-tighten first to prevent binding and recheck alignment before full torque. - 6
Reconnect and test the drain system
Attach the drain hose, open the valve fully, and check for leaks around the threads. If leaks appear, tighten slightly and recheck. Remove the hose when finished and prepare to refill the tank.
Tip: Have towels ready as leaks may occur during valve testing. - 7
Refill, restore power, and verify
Close the drain valve, remove the bucket, and slowly reopen the cold-water supply. Allow the tank to fill completely, then restore power or gas according to the heater type. Bleed air by opening a hot faucet until water flows steadily, then recheck for leaks.
Tip: Finally, run the hot water for several minutes to ensure air is purged and the valve remains leak-free.
Got Questions?
Can I replace a water heater drain valve myself, or should I hire a plumber?
Yes, a confident homeowner can replace a drain valve using basic hand tools and safety precautions. If you’re uncomfortable with electrical or gas connections, or if the valve is in a cramped area, consider hiring a licensed plumber. Always turn off power and the cold-water supply first.
Yes, you can replace it if you’re comfortable with basic plumbing and safety steps. If in doubt, hire a professional to avoid risks.
Do I need to drain the entire tank to replace the valve?
Often you can replace the valve after draining only enough water to clear the valve and make the area safe. Check the valve location and ensure you won’t lose control of hot water during the process. In some setups, partial drainage is sufficient; in others, full drainage may be safer.
Typically you drain just enough to work safely; full drainage isn’t always required.
What if the new valve leaks after installation?
First, tighten the valve slightly by hand and with a wrench, never over-tighten. If a leak persists, recheck the threads and consider reapplying thread sealant or replacing the gasket if included. Confirm the tank is fully refilled and that air has bled from the system.
If leaks persist, recheck threads and gasket; ensure full tank refill and air bleed.
Are all water heaters compatible with the same drain valve?
Most residential heaters use standard 3/4" garden-hose-thread drains, but some units may vary. Always verify thread size and hose connection before buying a replacement. If in doubt, bring the existing valve to a hardware store for comparison.
Most are standard, but always verify thread size before buying.
What safety steps should I take before starting?
Power off the heater, close the cold-water supply, and relieve pressure by opening a hot faucet. Wear eye protection and gloves, and have towels ready for spills. If you smell gas or suspect a gas leak, evacuate and call the gas company.
Shut off power and water, relieve pressure, and wear protection. If gas is involved, evacuate immediately.
Watch Video
The Essentials
- Plan the replacement with the heater off and water supply closed.
- Use the correct replacement valve and sealant for a leak-free fit.
- Refill slowly, bleed air, and verify no leaks after power restoration.
- Schedule periodic maintenance to extend heater life and prevent failures.